FAQ
To avoid the deterioration and degradation of parts, perform the following tasks prior to storing your barbecue for the season.
- Remove and clean all components
- Season cooking grates with vegetable shortening and wrap in a towel
- Remove the igniter battery to avoid corrosion
- Use a barbecue cover to help protect your barbecue
Proper set up of your Flare-free cooking grates is critical to the system working correctly. Not following the correct set up will mean you are not using the Flare-free system the way it was designed and tested. You will have the best results using the double grates in the correct orientation to help protect your burner box, heat plates and burners from corrosion and deterioration by removing 75% more grease. The grates are designed to be double stacked. To correctly set up your Flare-free cooking grates follow these quick steps:
Flare-ups occur when food drippings fall onto the heat plates or burners and ignite. To avoid flare-ups:
- Trim fat from meats before grilling.
- Always apply sauces after cooking.
- Always cook with the lid down and cook at the lowest most efficient heat setting.
- Ensure key parts, such as: heat plates, cooking grates and the burner box are cleaned regularly to eliminate grease build up.
A sudden increase in flare-ups will indicate the need to perform cleaning maintenance.
Yes, please contact the Coleman Customer Support Hotline at 1-800-275-4617 to place an order for a replacement control knob.
If your unit is not going beyond 300 degrees it is because your regulator’s Flow Limiting Feature has been activated, mainly due to improper lighting procedure. The flow limiting device is a safety feature built into the propane regulator that detects a change in pressure, limiting the amount of propane that is delivered to a BBQ’s valve assembly, causing unstable performance. Follow these quick steps to reset the regulator and correct the issue
How do I Order Replacement parts? at https://shop.colemanbbqs.com/ or at http://www.colemanbbqs.com/en/ and click on the "Shop Parts" tab. You can shop all the parts available for your barbecue by first selecting your barbecue model and navigating through the parts available.
ONLY barbecues bearing the Convertible Valve System logo on the front of the barbecue’s control panel, are convertible from propane to natural gas. Visit www.cvsbbq.com to see if your barbecue has this feature.
If your barbecue does include the Convertible Valve SystemMC, you will need a convertible valve system kit – Sold Separately; available at Canadian Tire (Product # 85-2261-4) to convert your barbecue from propane to natural gas.
When you are unsure if you have enough propane to cook, weigh your cylinder to determine if it`s time to refill. Most 20 lb. propane cylinders weigh about 17 pounds when empty and can hold up to 20 pounds of gas. A full tank should weigh approximately 36.6 to 37 lbs.
Cast iron cooking grates will rust if they become dry. Cast iron grates must be seasoned with vegetable shortening or oil to remain wet and prevent rust. Repeating the seasoning process several times will create a stronger “seasoning” bond. New cooking grates especially require many seasoning applications before they have a strong coating.
You can restore your cooking grates by brushing them clean, washing them with soap and water to remove any rust residue and then drying thoroughly. Once dry you should apply a generous coating of vegetable shortening to season the cooking grates. Make certain that your grates never lose their protective coating by applying more vegetable shortening or oil as needed so that they never have a dry look.
The interior of your BBQ lid is aluminum and is NOT painted. We do not coat the inside of our lids with any material that is capable of peeling off. What you are noticing is carbon build-up, a deposit of grease and smoke that collects during normal use. During use, the grease and smoke vapors slowly oxidize into carbon and collect on the inside of the lid. This deposit will eventually peel, and looks very similar to paint. The peeling normally starts in the center of the lid and spreads outward. It may come off in sheets or flakes, and is shiny on one side and dull on the other.
To remove, simply brush off all loose particles with a stiff bristle brush or use a ball of aluminum foil to scrub away the build-up. To prevent future build-up, after every grilling session, while the BBQ lid is warm to the touch—NOT HOT—wipe it with paper towel and a mild soap and water solution. Remember to perform a burn off before using to ensure that the soap isn`t being cooked into your food.
There are a few reasons the ignitor may not be lighting the burners, before replacing please check the following:
1) Check to see if the ignition battery is dead and installed correctly (if applicable)
2) Check that the electrode wires for the ignition are connected and not loose
3) Check that the ignition button lead wires are connected and not loose
If the problem persists, please contact the Coleman Customer Support Hotline at 1-800-275-4617 to order a replacement ignitor.
Leveling your Cookout™ 36” griddle station will ensure proper flow of grease on the griddle top, into the grease channel and into the awaiting grease catch.
To level your griddle:
- Choose the griddle station location.
- Use a level to determine if any adjustments are required.
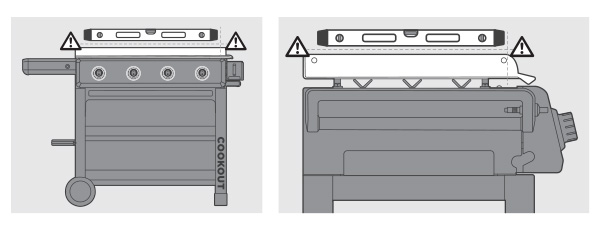
- Adjust the griddle top height by turning the leveling nut on the griddle feet, to ensure positive flow of grease to the grease catch.
Seasoning your griddle top improves the cooking performance, creates a non-stick surface for cooking, prevents damage and deterioration due to moisture and humidity, and extends the life of your griddle station.
- Clean the griddle top with a damp cloth to remove any dust/dirt.
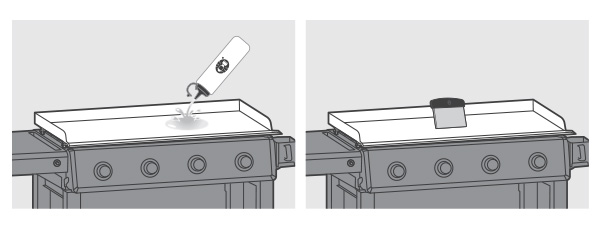
- Apply oil to the griddle top, sides and corners. Use a paper towel to coat surface thoroughly.

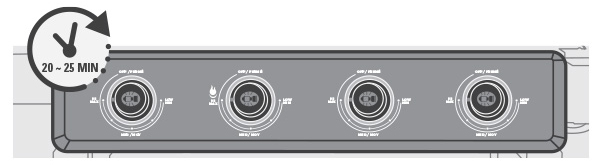
- Light the griddle station and set temperature controls to the "Preheat" setting.
- Heat the oil to its smoke point. You will notice the griddle top changing colour.
- When the oil stops smoking, turn your griddle "OFF" and let it cool.
- Repeat steps 2 to 4, about 5 times, until the griddle surface becomes dark.

Oil's For Seasoning
- a. Vegetable oil
- b. Vegetable shortening
- c. Canola oil
- d. Flax oil
Olive oil - Not ideal. Burns off at lower temperatures than the other options above.
Preheat your griddle station. Use a water bottle to squirt the griddle surface. Use a griddle scraper to loosen any debris on the surface. Apply more water if needed. Be careful not to use too much water, as you may overflow the grease catch. Once the griddle top is reasonably clean, scraped and dry, apply a thin coat of oil to maintain the seasoning bond and prevent rust.
The appearance of rust spots on the griddle top, is an indication that the protective seasoning has worn off and must be repeated. Begin by dampening the surface with water. With protective gloves and steel wool, scrub the areas of concern until the rust has been lifted from the surface. Rinse the surface thoroughly. Be careful not to overflow the grease catch. Wipe the griddle surface with a cloth or paper towel if needed.
Re-season 3-5X.
How to Season
- 1. Clean the griddle top with a damp cloth to remove any dust/dirt.
- 2. Apply oil to the griddle top, sides and corners. Use a paper towel to coat surface thoroughly.
- 3. Light the griddle station and set temperature controls to the "Preheat" setting.
- 4. Heat the oil to its smoke point. You will notice the griddle top changing colour.
- 5. When the oil stops smoking, turn your griddle "OFF" and let it cool.
- 6. Repeat steps 2 to 4, about 5 times, until the griddle surface becomes dark.
You can use any 100% all-natural hardwood pellets that are meant for pellet grills. Never use pellets meant for heaters as they often contain softer wood and other impurities that can limit the effectiveness of the grill and affect the taste of your food.
To use the "SMOKE" setting, set the temperature between 160°F to 200°F the "SMOKE" setting icon will appear on the screen. To maintain the temperature in the "SMOKE" setting, adjust the P setting to make small adjustments to the pellet delivery cycle to compensate for ambient temperatures, humidity, wind, environmental changes, pellet fuel type, quality and to ensure optimal performance.
The "PRIME" function manually feeds pellets to the auger and initiates a 150 second countdown to completion. The "PRIME" function is designed to reduce startup times when the auger is free of pellets. The "PRIME" button can be used when lighting your grill for the first time or when relighting after your grill has run out of fuel.
Shutdown procedure:
- 1. Press and hold the selection dial until the home screen turns "OFF". The combustion fan will remain on until the unit has cooled down.
- 2. Empty all pellets from the hopper in between uses and before storing your grill.
Do not unplug the unit until the fan has turned off.
How to clean out the Hopper Assembly?
- 1. Press and hold the selection dial to shut down.
- 2. Unplug the power cord. Note: Let unit cool before continuing.
- 3. Position a bucket under the pellet release channel. Unscrew the bolt and remove the channel stopper. Pellets will begin to empty quickly. Check the contents of the hopper to ensure that all pellets have emptied. Use a Wet/Dry Vac to remove any leftover saw dust from the hopper housing and auger box.
- 4. With the hopper empty, reassemble the channel stopper.
- 5. When prepping for your next cook, refill the hopper with all-natural hardwood pellets.
To avoid the deterioration and degradation of parts, perform the following tasks prior to storing your pellet grill for the season.
- Perform all cleaning and maintenance steps outlined in the User manual.
- Wrap cooking grates and baffle plate in a towel and store indoors.
- It is critical that all pellets and ash are removed from the unit before storing.
- If available, store your grill in a garage, or shed, and place a piece of cardboard underneath your unit to protect from concrete moisture damage.
- Always use a pellet grill cover (085-2223-6) to protect your pellet grill.
Yes, the meat probes are intended to check the progress and temperature of your food until completion.
The Cookout™ pellet grill has a heavy gauge steel baffle plate that is coated with soy oil after production. If you're seeing rust, do not worry, this is normal. The baffle plate is under the most extreme conditions, with grease and sauce drippings, as well as being positioned above the burner pot, where the pellets are burned for long periods of time. The baffle plate is extra thick and heavy, to withstand these conditions and prevent burn through, therefore, maintenance is key. This part must be cleaned on a regular basis. Do not allow sauces and other acidic drippings to stay on the surface. Covering the baffle plate with aluminum foil is a great option to protect the part and keep it clean.